| 일 | 월 | 화 | 수 | 목 | 금 | 토 |
|---|---|---|---|---|---|---|
| 1 | 2 | 3 | 4 | 5 | 6 | 7 |
| 8 | 9 | 10 | 11 | 12 | 13 | 14 |
| 15 | 16 | 17 | 18 | 19 | 20 | 21 |
| 22 | 23 | 24 | 25 | 26 | 27 | 28 |
- UML
- 안드로이드 gcm
- android 효과음
- html5
- FCM
- PHP
- WebView
- 안드로이드 푸시
- curl
- 폼메일
- 우분투
- chart.js
- php 취약점
- dovecot
- 설치
- 자바스크립트
- 안드로이드 푸쉬
- not working
- 자동 생성
- javascript
- mysql
- C#
- php 시큐어코딩
- soundpool
- xe
- C# IO
- roundcube
- Mail Server
- Android
- 안드로이드
- Today
- Total
그러냐
[Android] 자동차 번호판 인식시키기 with OpenCV + Tesseract-OCR 본문
안드로이드 앱용으로 OpenCV와 Tesseract-OCR을 이용한 자동차 번호판을 인식하는 데모 소스가 안보여서 한번 만들어 봤다. 처음에는 OpenALPR을 이용해 볼까 했는데, 안드로이드용에 맞게 컴파일하는데 너무 복잡해서 사용하기 적당해 보이지 않았다. 사실 OpenALPR 내에서 OpenCV와 Tesseract-OCR을 내부에서 사용하고 있고 자동차 번호판에 특화되어서 OpenCV처리를 하는 걸로 보이니 OpenCV를 이용하여 직접 코딩을 하면 비슷한 처리가 가능하지 않을까 싶어서 시도해 봤다.
먼저, OpenCV를 안드로이드 모듈로 임포트를 해야 하는데 단계가 좀 복잡한데... 이걸 아주 잘 설명해놓은 사이트가 있다. 이 사이트에는 Tesseract-OCR 사용법까지 잘 설명되어 있다.

Android에서 Tesseract 사용하기 for OCR
Python에서 Tesseract 사용하기 for OCR에서는 Python 환경에서 Tesseract 사용 방법을 알아 봤다. 이번에는 모바일 환경에서 카메라를 이용해 이미지를 촬영하고, 해당 이미지에 대해 동시에 OCR을 수행하기 위해 Android에서 Tesseract를 사용하는 방법을 알아볼 것이다. 글에서 다루는 안드로이드 Tesseract 샘플 프로젝트는 Github를 통해 받을 수 있다.
junyoung-jamong.github.io
위에 나온 코드를 많이 참고했다. 하지만 Camera1 API를 사용하고 있어서 Camera관련 코드들이 deprecated 되어 있는게 많아서 Camera2 API를 사용하는 코드로 변경해보기로 했다. 그리고, 여기에 자동차 번호판 추출 로직을 추가했다.
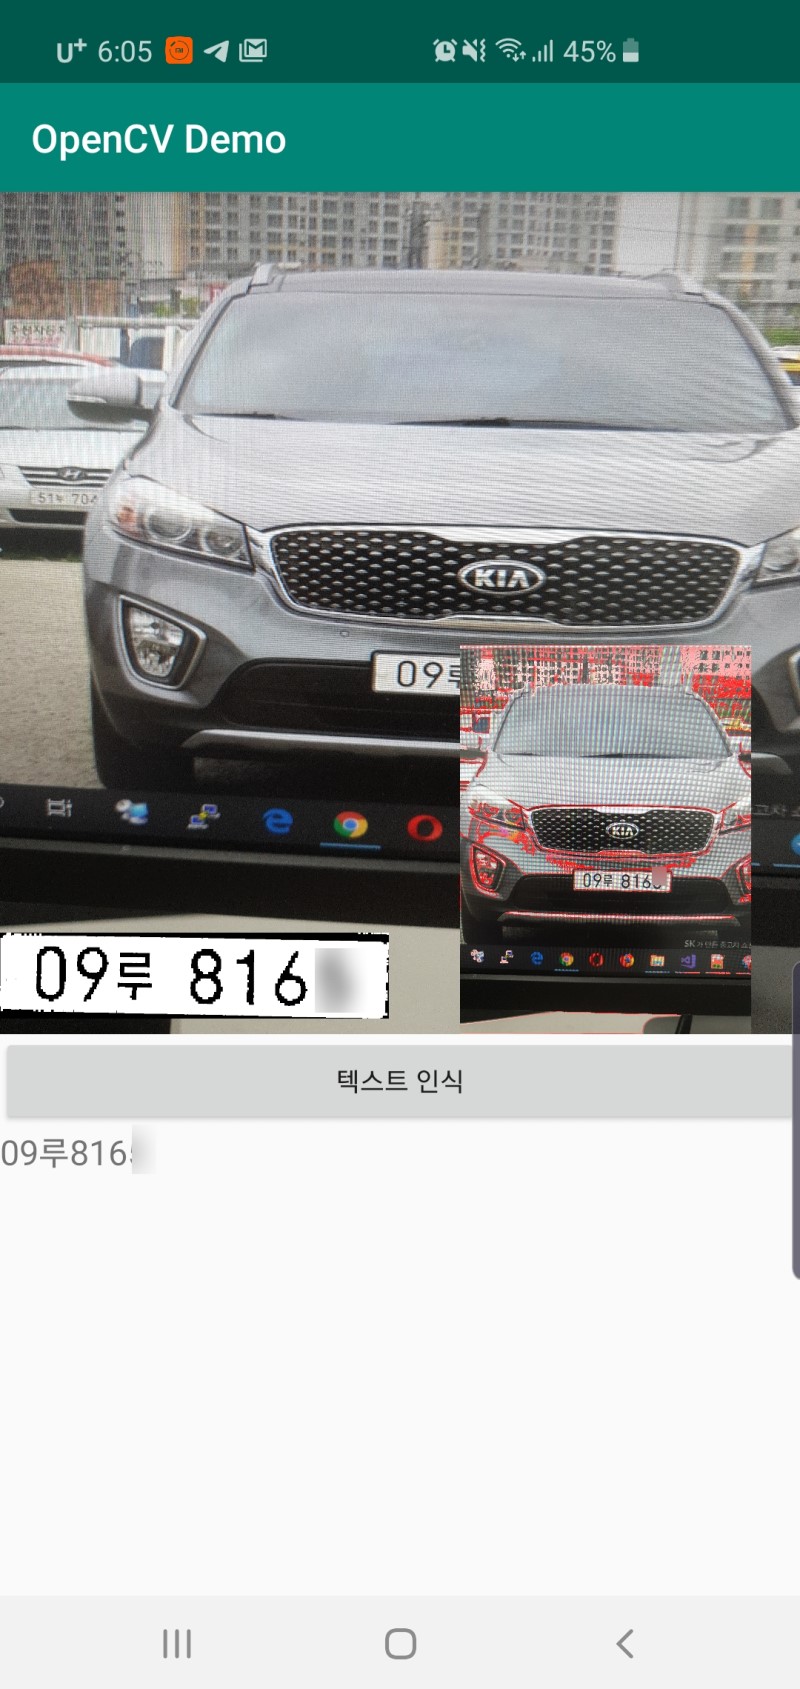
프로그램의 처리단계는 먼저 Preview 상태로 카메라로 부터 영상을 받아오고 텍스트인식 버튼을 클릭하면 이미지를 캡쳐한다. 그 이미지에서 에지추출 처리를 한 후 관심영역을 추출하고 추출된 영역을 Tesseract-OCR에 넘긴다. 그런데 생각보다 Tesseract-OCR이 한글인식률이 좀 떨이지는 것 같다. 번호판에 적힌 폰트에 대한 인식률이 낮아서, 번호판 폰트에대한 학습이 필요해 보인다.
그리고, OpenCV로 번호판 추출하는 코드도 간단하게 기본 개념만 파악할 수 있도록 데모용으로 아주 짧게 코딩하여서 잘못 추출하기도 한다. 알고리즘을 좀더 잘 인식할 수 있도록 수정하여 주차장 관리 프로그램을 만들어 볼까 생각중이다.

OpenCV 데모 실행화면
위에 이미지에서 오른쪽에 작은 이미지는 추출된 관심영역들을 빨간선으로 그린 것이고, 거기서 최종 추출된 관심영역이 왼쪽 번호판 이미지이다.
build.gradle (Module: app) 은 다음과 같다.
apply plugin: 'com.android.application' android { compileSdkVersion 29 buildToolsVersion "29.0.1" defaultConfig { applicationId "com.beodeulsoft.opencvdemo" minSdkVersion 23 targetSdkVersion 26 versionCode 1 versionName "1.0" testInstrumentationRunner "androidx.test.runner.AndroidJUnitRunner" externalNativeBuild { cmake { cppFlags "" } } } buildTypes { release { minifyEnabled false proguardFiles getDefaultProguardFile('proguard-android-optimize.txt'), 'proguard-rules.pro' } } externalNativeBuild { cmake { path "src/main/cpp/CMakeLists.txt" version "3.10.2" } } } dependencies { implementation fileTree(dir: 'libs', include: ['*.jar']) implementation 'androidx.appcompat:appcompat:1.0.2' implementation 'androidx.constraintlayout:constraintlayout:1.1.3' testImplementation 'junit:junit:4.12' androidTestImplementation 'androidx.test:runner:1.2.0' androidTestImplementation 'androidx.test.espresso:espresso-core:3.2.0' implementation project(path: ':opencv') implementation 'com.rmtheis:tess-two:9.0.0' }
전체소스는 너무 커서 app > src > main 폴더만 압축해서 첨부한다. 압축파일 안에 Tesseract-OCR 한글 학습데이타도 포함되어 있다.
첨부파일
opencvdemo_main.zip
이미지 캡쳐시 처리하는 로직은 다음과 같다.
ImageReader.OnImageAvailableListener readerListener = new ImageReader.OnImageAvailableListener() { @Override public void onImageAvailable(ImageReader reader) { Image image = null; try { image = reader.acquireLatestImage(); ByteBuffer buffer = image.getPlanes()[0].getBuffer(); byte[] bytes = new byte[buffer.capacity()]; buffer.get(bytes); Log.d(TAG, "takePicture"); BitmapFactory.Options options = new BitmapFactory.Options(); options.inSampleSize = 8; Bitmap bitmap = BitmapFactory.decodeByteArray(bytes, 0, bytes.length, options); bitmap = GetRotatedBitmap(bitmap, 90); Bitmap imgRoi; OpenCVLoader.initDebug(); // 초기화 Mat matBase=new Mat(); Utils.bitmapToMat(bitmap ,matBase); Mat matGray = new Mat(); Mat matCny = new Mat(); Imgproc.cvtColor(matBase, matGray, Imgproc.COLOR_BGR2GRAY); // GrayScale Imgproc.Canny(matGray, matCny, 10, 100, 3, true); // Canny Edge 검출 Imgproc.threshold(matGray, matCny, 150, 255, Imgproc.THRESH_BINARY); //Binary List<MatOfPoint> contours = new ArrayList<>(); Mat hierarchy = new Mat(); //노이즈제거 Imgproc.erode(matCny, matCny, Imgproc.getStructuringElement(Imgproc.MORPH_RECT, new org.opencv.core.Size(6, 6))); Imgproc.dilate(matCny, matCny, Imgproc.getStructuringElement(Imgproc.MORPH_RECT, new org.opencv.core.Size(12, 12))); //관심영역 추출 Imgproc.findContours(matCny, contours, hierarchy, Imgproc.RETR_EXTERNAL, Imgproc.CHAIN_APPROX_SIMPLE);//RETR_EXTERNAL //RETR_TREE Imgproc.drawContours(matBase, contours, -1, new Scalar(255, 0, 0), 5); imgBase= Bitmap.createBitmap(matBase.cols(), matBase.rows(), Bitmap.Config.ARGB_8888); // 비트맵 생성 Utils.matToBitmap(matBase, imgBase); // Mat을 비트맵으로 변환 new Thread(new Runnable() { @Override public void run() { runOnUiThread(new Runnable(){ @Override public void run() { imageView.setImageBitmap(imgBase); } }); } }).start(); imgRoi= Bitmap.createBitmap(matCny.cols(), matCny.rows(), Bitmap.Config.ARGB_8888); // 비트맵 생성 Utils.matToBitmap(matCny, imgRoi); for(int idx = 0; idx >= 0; idx = (int) hierarchy.get(0, idx)[0]) { MatOfPoint matOfPoint = contours.get(idx); Rect rect = Imgproc.boundingRect(matOfPoint); if (rect.width < 30 || rect.height < 30 || rect.width <= rect.height || rect.width <= rect.height * 3 || rect.width >= rect.height * 6) continue; // 사각형 크기에 따라 출력 여부 결정 roi = Bitmap.createBitmap( imgRoi, (int)rect.tl().x, (int)rect.tl().y, rect.width, rect.height); new Thread(new Runnable() { @Override public void run() { runOnUiThread(new Runnable(){ @Override public void run() { imageResult.setImageBitmap(roi); new AsyncTess().execute(roi); btnTakePicture.setEnabled(false); btnTakePicture.setText("텍스트 인식중..."); } }); } }).start(); break; } } catch (Exception e) { e.printStackTrace(); } finally { if (image != null) { image.close(); } } } };
참고사이트

안드로이드 OpenCV 관심영역(ROI) 추출
이번 시간에는 OpenCV를 이용하여 관심역영(ROI)을 추출하겠습니다. 관심영역 추출은 문자인식 전처리 기법 중 하나로 인식 할 범위를 대폭 축소시켜 프로그램 전반적인 실행속도를 향상 시키고 인식률 또한 높일..
yeolco.tistory.com
https://inducesmile.com/android/android-camera2-api-example-tutorial/
Android Camera2 API Example Tutorial
In this tutorial, we are going to learn how to implement android camera 2 API. This example tutorial will focus on the new android camera api, if you are lookin
inducesmile.com
출처 : https://m.blog.naver.com/PostView.naver?isHttpsRedirect=true&blogId=beodeulpiri&logNo=221610049429
[Android] 자동차 번호판 인식시키기 with OpenCV + Tesseract-OCR
안드로이드 앱용으로 OpenCV와 Tesseract-OCR을 이용한 자동차 번호판을 인식하는 데모 소스가 안보...
blog.naver.com
'android' 카테고리의 다른 글
| 안드로이드 스튜디오 음성인식 사용하기 구글 STT (Speech-to-Text) (0) | 2022.05.31 |
|---|---|
| 안드로이드 루팅 체크 (2) | 2022.05.30 |
| Android에서 Tesseract 사용하기 for OCR (0) | 2021.06.23 |
| 안드로이드 엑티비티 배경 투명하게 (0) | 2021.06.17 |
| 안드로이드 블루투스 검색 안될 때 Permission denial: Location is off (0) | 2021.02.08 |


